
The subject to be pulled back from the elaborate format isn't on a comparable plane (photo underneath). This is particularly the circumstance for pictures where the establishment is normally two or three meters away. For this circumstance, the tendency can't be straight.
Accomplishing a decent profundity of the field when shooting isn't in every case simple. Try not to toss your photographs in the garbage. This instructional exercise will give all of you the keys to enable you to make a foggy region on your photographs.
The control of the profundity of the field is something basic in the achievement of a shooting. This makes it conceivable to detach the subject or to obscure an unattractive foundation. If the most experienced picture takers ace it to the millimeter or even less (yet hello, they have the gear that goes with it too ...), this is a long way from being the situation for everybody. Luckily for us, photograph altering programming enables you to do this effectively.
I determine that on the off chance that we can add obscure to a picture, the turn around is tragically impractical: a foggy photograph can never be made obvious (see " the 5 furthest reaches of photograph altering programming ").
There are two primary strategies for falsely making a shallow profundity of field. Every one of these methods will enable you to alter a kind of photograph:
First case: the subject is on one plane (which is the situation of the photograph above). Undoubtedly, as should be obvious, the separation between the supplication wheels is moderately little (on the request for a couple of centimeters). Making a foggy region on this kind of photograph is then very basic. For this situation, you obscure the whole photograph and afterward apply a rectilinear inclination to the zone that will relate to the sharp piece of the picture.
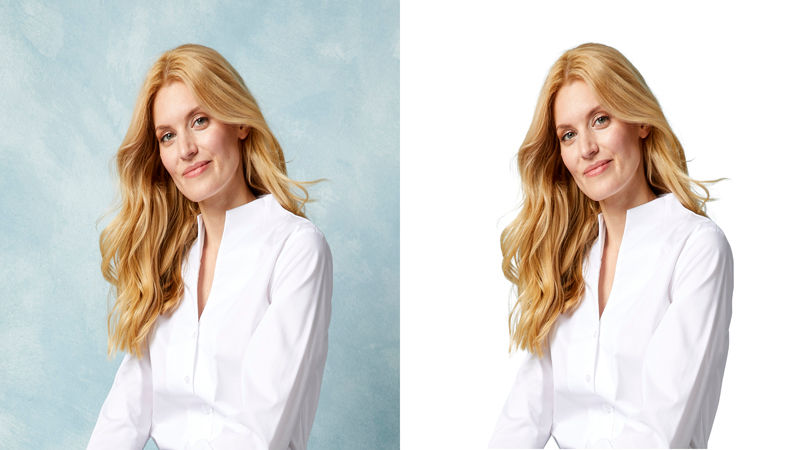
Second case: the subject to be withdrawn from the stylistic layout isn't on a similar plane (photograph beneath). This is especially the situation for pictures where the foundation is commonly a couple of meters away. For this situation, the inclination can't be straight. It is, in this way, important to detach the primary subject before applying the haze territory.
The execution of these two strategies is depicted in both Photoshop Elements and Gimp programming. You can likewise, if you wish, see the video instructional exercise at the base of this page.
1-The subject is on a similar plane as the territory to be obscured.
In any case, before altering this photograph, here are a few clarifications on the strategy that we will utilize. The rule, in this manner, comprises making an obscured photograph that will be situated over the sharp photograph. The fluffy picture will at that point be connected to a layer cover (or veil layer in GIMP). The reality of making a slope on this combination veil will make this zone straightforward and will, thusly, enable you to perceive what is on the layer beneath, to be specific the sharp photograph.
In a photograph, the territory around the obscuring of sharpness is frequently very short. It will, in this manner, be important to make a customized inclination. So now we should see the technique with the two programmings:
With Photoshop Elements.
Open the photograph to be altered and afterward make a duplicate of it on another (Layer/Duplicate layer order… ). The new layer is in this manner found over the first photograph.
Add a layered veil to this new (Layer/Layer cover/Show all direction). A white square shape currently appears to one side of your photograph. You should then get a layer overlay as on the screen capture beneath.
Obscure the photograph that is connected to the combination cover. To do as such, click on the layer picture (it is then encircled) at that point apply the More obscured channel (Filter/Blur direction). Rehash this until you get your preferred haze. For a better chance, you can likewise utilize the Blur channel.
Select the dark shading by tapping on the two squares at the base of the device palette (the dark square should, along these lines, be in the frontal area).
To make the angle, select the Gradient instrument at that point click on the Modify button at the top just beneath the menu bar. Pick the Foreground - > straightforward inclination at that point move the little dark square (1) to the estimation of half (2). I encourage you to spare it by naming it (3) and tapping on new (4). It will be that less to accomplish for your next photograph to modify.
Select the combination veil (the white square to one side of the photograph) by tapping on it. We are presently prepared to make the sharpness zone.
Pick the Reflected Gradient symbol (under the menu bar) and, while squeezing the SHIFT key, draw a line by relocating comparing to half of the region you need to show up in the net. For sure, as the name recommends, the inclination made will naturally repeat on the contrary side to make something impeccably even.
Photograph altering tip: by tapping on the little chain that associates the combination cover to the layer, you will break the connection and you will have the option to move your combination veil in your photograph (it stays fixed). In our model, this is exceptionally reasonable because it enables me to situate the sharpness zone definitely (between the wooden upstanding and the edge of the petition wheel).
The altering of this photograph is practically finished. All that remaining parts is to obscure the wooden structure (5) and to make the little bit of wood and the edge of the petition wheel (6) clean.
to obscure (5): select the brush device and the white shading, go to the combination veil at that point disregard the brush the zone to obscure.
to make it obvious (6): take a similar apparatus, select the dark shading and disregard the brush the regions to be honed.
With Gimp.
Obscured photograph creation:
Open the photograph to be altered and afterward make another (Layer/Duplicate layer order).
Add a layered veil to the layer you just made (Layer/Mask/Add a layer cover… order). Pick the "white (full murkiness)" alternative.
Formation of the customized slope:
Show the slope (Window menu/Dockable windows/Gradients) and pick the inclination "PP to Transparent". Right-click on this angle at that point select the choice "Copy slope".
Move the little white triangle to one side to abbreviate the progress zone between the straightforward and the dark. Remember to name your angle.
Making of the zone of sharpness:
Select the "Bilinear" alternative (1) and set a counterbalance to 50 (2) in the choices that show up beneath the tool stash.
Go to the layer cover at that point snap and drag oppositely to make the territory of sharpness.
Little completing contacts:
Take the brush instrument at that point pick a round brush. Go to the layer cover and paint the territories you need to clarify in dark and those that ought to get obscured in white.
2-The subject is on an alternate plane from the zone to be obscured.
Making an obscured zone is more convoluted because the angle isn't straight. Undoubtedly, it will be important to utilize the determination devices to confine the subject which must stay clear.
With Photoshop Elements.
Take your preferred apparatus to diagram the subject. You will discover one of the section systems by going to one of my past instructional exercises (cf. How to change the white sky into the blue sky? ). I would call attention to that fine cutting (hair, twigs, and so forth.) is as of now unrealistic with these 2 programming programs. Care should, in this manner, be taken not to pick a subject that is too hard to even think about cutting out.
Spare your choice (Selection/Save determination… menu).
Make the new layer, mixing cover and obscure as recently clarified.
Go to the blended veil and recover the choice (Selection/Retrieve determination… ).
Take the Paint Bucket instrument and pick the dark shading. Snap in the framework.
If the photograph requires it, you may likewise need to utilize the angled instrument again in your combination cover (which is the situation for the model beneath).
Since there is a combination cover, you can likewise, as referenced above, make little changes with the brush instrument.
The Gimp.
Cut out your subject as referenced in the instructional exercise "How to change the white sky into the blue sky?" » And spare the determination (Menu Selection/Save in a channel).
Make the new layer, obscure and layer veil as portrayed previously.
Select the layer veil at that point proceed to discover the choice in the channels discourse box (1). Snap-on the choice veil that you spared before (2) at that point add the choice to the layer cover by tapping on the little red square (3).
The making of the angle or the correcting of the obscured or sharp zones is done as depicted beforehand.
Also read more,
Clippingphotoindia is the topmost mainstream image masking specialist organization in the world, we are furnishing any sort of covering administration with superior quality.
Tag:
 2418
2418