
Include the Hue/Saturation and Brightness differentiate alteration layers on your image (Layer/New alternate layer/Brightness Contrast and Hue/Saturation). Try now not to prevent for a second to push the characteristics (see display screen capture under) to get a persuading end result.
Is it accurate to say that you are great at drawing? Why not attempt light artistic creation for this situation? As you will see, the entirety of this impact happens at the shooting and accordingly doesn't require utilizing your photograph altering programming for this instructional exercise.
Light artistic creation, which comprises of painting light, is an extremely fun procedure. If you are hoping to add a dash of inventiveness to your photographs, the light composition is for you ...
The standard is as per the following: you will point a spotlight towards your camera and will draw shapes during the length of the presentation of your photograph.
As reported above, there is no photomontage to accomplish this kind of photograph. All the acknowledgment of this impact will be finished during the shooting (aside from potentially to address the presentation of your photograph).
Hardware
Light artistic creation requires the accompanying hardware:
A camera! Since it is important to work with presentation times of a few seconds, it is basic to have a gadget that is structured ageable, in other words, that permits manual modification of the introduction time.
A tripod
An adaptable trigger with remote control (fundamental on the off chance that you are distant from everyone else).
A light. Regardless of the model. You can likewise utilize a few to shift the impacts of shading, force, and shape.
Light artwork
You will, in this way, need to alter your case to have an opening time of a few seconds. There are two strategies for this:
You have an adaptable trigger with remote control: set your camera to present B (bulb).
You don't have an adaptable trigger: for this situation, change your camera to manual mode (M), set a speed of 15 to 30 seconds and set the self-clock.
Alter the other shooting parameters as pursues:
Close the opening (f 9) for instance. On the off chance that, as in my model, you need to snap a picture or it isn't dull, close the opening quite far (here f 22).
Set the sensor affectability to ISO 100.
Mount your camera on your tripod and decide the surrounding.
Get set up and press your trigger. Turn on your light and direct the light shaft towards your crate.
Photography guidance:
Take the primary photograph without playing with the light to ensure that your presentation time and your opening are right. On the off chance that your photograph is excessively dull, increment the gap esteem.
Ponder the attracting you need to make and set benchmarks in your stylistic layout (recall that it is somewhat hard to draw when you don't perceive what you are drawing).
Don't hesitate to move when you draw. If you don't, an apparition shadow may show up and the impact will be less effective. It is consequently that I prescribe that you have a genuinely long presentation time, regardless of whether your drawing takes just 3 or 4 seconds to be delivered.
On the off chance that you choose to place an individual in your acknowledgment, put ablaze to make them obvious.
If you need to do the light canvas visible to everyone, for this situation, utilize a nonpartisan thickness channel.
How to make a small scale impact on a photograph?
The picture taker is looking increasingly more to have a great time while taking his photographs. The creators of photographic materials have gotten this and it is sufficient to be persuaded of it to take a gander at the number of inventive modes that exist in current computerized cameras. Among these, there is one that enables you to give a thumbnail impression to your photographs. This impact has a name: the Tilt-Shift.
Then again, on the off chance that you search for this term in your APN, you may not discover it since it isn't extremely interesting for the overall population. Producers like to utilize terms like smaller than expected impact, model or toy which are significantly more express ...
How is this smaller than normal impression conceivable?
It is identified with the exceptionally powerless zone of sharpness present in the picture. Add to that, splendid hues, a genuinely articulated complexity and you trap your mind each time …
Doing it when shooting with your advanced camera is great, yet doing it in after generation, unobtrusively before your PC, with a little espresso, it's far better !! To be sure, doing it without anyone else's help from start to finish enables you to exact portion and position the haze impact, the territory of sharpness or the immersion of hues.
What programming to make a smaller than normal impact?
Making the small impact is inside the span of by far most of the picture altering programming planned for the production of photomontages. The basic capacities that your product must have are layer the executives, layer veils and a channel permitting obscuring.
To play out this photomontage, I picked Photoshop Elements programming. So how about we see immediately how to do it…
Obscure application:
Open the photograph to adjust at that point copy the (Layer/Duplicate the layer… ). Add a haze impact to the upper layer (Filter/Blur/More haze). Try not to spare a moment to rehash this impact to have a noteworthy haze. Name this layer "Obscure".
Include a layer cover (Layer/Layer veil/Show all) to the "Obscure" layer.
Take the angle apparatus, select the dark shading, pick the Reflected slope choice (1) and take the dark white inclination (2).
If you utilize the angle as may be, the impact will be medium. Why? Since the slope is excessively delicate (in other words the contrast between the unmistakable zone and that, impeccably obscured). You need to abbreviate this region to have something persuading.
To do as such, double-tap in the slope: another window shows up (see screen capture underneath). Presently move the little dark square (3) and the capsule (4) to get the proportionate qualities in the screen capture underneath (80% for the area of the dark square and 25% for the rhombus). Make sure to name and spare your new inclination (5). You will have the option to reuse your inclination for your next pictures.
Spot yourself on the combination veil (the white casing to one side of the photograph), press the Shift key (this enables you to have a rectilinear slope) and, by clicking and hauling, decide the zone to be clarified. If you are not happy with the outcome, no compelling reason to drop the past activity. Rethink the haze territory (the past line will be supplanted by the enhanced one).
If essential, increment the sharpness of the layer beneath (Accentuation/Adjust sharpness, and so on.) to additionally complement the profundity of field impact.
To have a persuading impact it is presently important to make certain zones obvious and others obscured. Undoubtedly, we should not overlook that the picture is in 2 measurements and that our cerebrum, it reasons in 3 D.
In our model (see beneath), the highest point of the structure on the privilege and the lampposts must be perfect (green bolts) because these components are on a similar plane. Then again, the lamppost, plants, and hindrances in the forefront must be obscured (blue bolt) because these components are before the territory of sharpness.
The combination cover made before will assist you with improving these well known foggy and clear regions ...
Take the brush device, decide its size at that point go to the combination veil. Pass the zones to be obscured in white and the regions to be honed in dark.
Support of immersion, adjustment of splendor and difference:
To have a reasonable smaller than normal impact, it is important to expand the shading immersion just as the splendor and the complexity.
Include the Hue/Saturation and Brightness differentiate alteration layers to your photograph (Layer/New change layer/Brightness Contrast and Hue/Saturation). Try not to stop for a second to push the qualities (see screen capture beneath) to get a persuading result.
Well, that is sufficient to make any model producer desirous…
Before closing, I connect the connection to the Photographic Flickr photograph display where you will discover other Tilt-move impacts that I have made.
For additional…
Know that product like Lightroom additionally enables you to make Tilt-Shift impacts (these will be somewhat less persuading, in any case). This can be exceptionally valuable since you would thus be able to consider making a Time Lapse in smaller than normal variants…
Also read more,
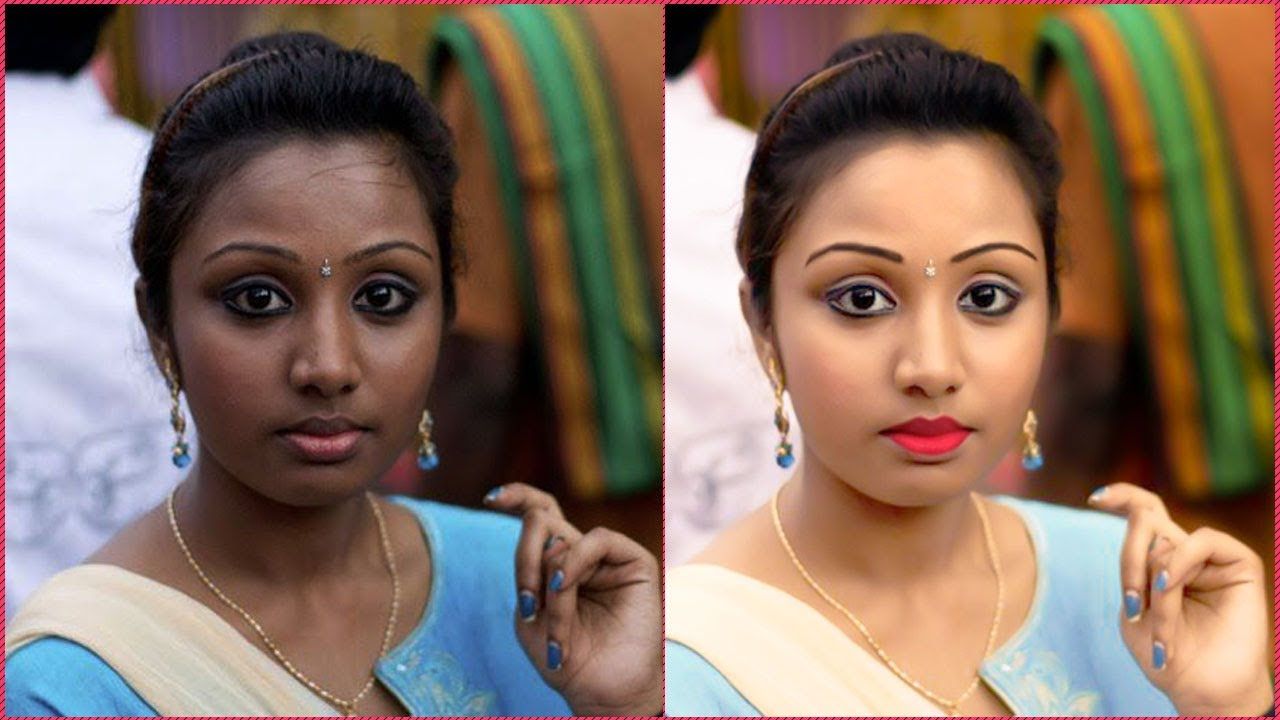
Image retouching is the procedure of altering a picture to prepare it for the final presentation. Retouchers normally carry out movements that might be small localized changes to a picture. Usually finished after globalized changes (which include color correction), retouching is the sprucing of a photo.
Tag:
 3220
3220