
System restore is a handy feature to utilize when your PC starts malfunctioning. The feature allows you to return to a previous checkpoint of the system with no issues. If you want to restore your system as well, then you are on the right post. Go through the blog and follow the instruction to use the System Restore on Windows 10. How to Use the System Restore on Windows 10 How to Allow the System Restore on Windows 10 If you want to allow the System Restore on Windows 10, then you can follow the provided steps: Go to Start. Locate Create a restore point and then select the top result to open System Properties. Choose the “System” drive below the “Protection Settings” and then tap on the Configure option. Click Turn on system protection button. Press the Apply option. Select OK. How to Make the Restore Point on Windows 10 System restore will make the checkpoints directly when it notices the system changes, but if the user needs to modify the installation particularly, then they have to make a restore point. If you wish to make the restore point on Windows 10, then pursue the given instructions: Go to Start. Locate the Create a restore point and then tap on the top result to launch System Properties. Select Create option below “Protection Settings” button. Input a descriptive name for the restore point. Choose the Create option. Press the Close option. Select OK. When the procedure is complete, the users can undo the changes if anything goes wrong when installing the new driver or application. How to Improve the System Restore If the user faces problems after doing the changes in the system, then they can troubleshoot the issue without wasting time. They can undo changes via the restore point created earlier. They can perform the task when the PC does not boot properly. Undo the System Changes via Desktop Experience If you want to undo the system changes via desktop experience, then abide by the given steps: Go to Start. Locate the Create a restore point then tap on the top result to launch the System Properties. Select System Restore. Choose the Next option. Click restore point that you like to use on PC. Tap Scan for affected program button to recognize apps that are no longer available. Hit the Close option. Select Next. Choose the Finish option. When the user completes the process, System restore will turn the PC into an older functioning condition. Undo the System Changes via Advanced Startup If the system is not working correctly or not starting successfully or you are unable to access the desktop, then you can use Advanced startup to access the System Restore. How to Boot in the Advanced Startup In case you intend to boot in the Advanced startup, then go through the below-mentioned steps: Switch on the PC. Click the power option when the logo displays to disrupt the booting process. Repeat the steps two times. When the procedure is complete, you can access the System Restore. Via System Restore The users can access the system restore when their PC does not start properly. Follow the provided instructions to boot via System Restore: Tap on Advanced option. Select Troubleshoot. Choose Advanced options. Press System Restore. Hit the Next option. Tap on restore point you like to use on PC. Select Scan for affected programs option to recognize the apps that are no longer accessible. Select the Close option. Choose Next. Hit the Finish option. When the user completes the process, the changes that are creating issues will be removed and the device will start working correctly. The users can use the same steps if they have the older version like Windows 8.1 or 7. Always be careful as the system restore is not the replacement for the backup or not the option to reset the PC in default settings. If a hard drive on a PC is facing physical problems or, then the user cannot recover the files. Aurora is an engineer by day and writer by night. Previously, Aurora worked as a certified technicians for a tech hardware startup. In her free time, she likes to write about printers, routers, web browsers, and other technical stuff. She majorly writes for canon printer support etc. Source: System Restore on Windows 10
System restore is a handy feature to utilize when your PC starts malfunctioning. The feature allows you to return to a previous checkpoint of the system with no issues. If you want to restore your system as well, then you are on the right post. Go through the blog and follow the instruction to use the System Restore on Windows 10.
How to Allow the System Restore on Windows 10
If you want to allow the System Restore on Windows 10, then you can follow the provided steps:
- Go to Start.
- Locate Create a restore point and then select the top result to open System Properties.
- Choose the “System” drive below the “Protection Settings” and then tap on the Configure option.
- Click Turn on system protection button.
- Press the Apply option.
- Select OK.
How to Make the Restore Point on Windows 10
System restore will make the checkpoints directly when it notices the system changes, but if the user needs to modify the installation particularly, then they have to make a restore point.
If you wish to make the restore point on Windows 10, then pursue the given instructions:
- Go to Start.
- Locate the Create a restore point and then tap on the top result to launch System Properties.
- Select Create option below “Protection Settings” button.
- Input a descriptive name for the restore point.
- Choose the Create option.
- Press the Close option.
- Select OK.
When the procedure is complete, the users can undo the changes if anything goes wrong when installing the new driver or application.
How to Improve the System Restore
If the user faces problems after doing the changes in the system, then they can troubleshoot the issue without wasting time. They can undo changes via the restore point created earlier. They can perform the task when the PC does not boot properly.
Undo the System Changes via Desktop Experience
If you want to undo the system changes via desktop experience, then abide by the given steps:
- Go to Start.
- Locate the Create a restore point then tap on the top result to launch the System Properties.
- Select System Restore.
- Choose the Next option.
- Click restore point that you like to use on PC.
- Tap Scan for affected program button to recognize apps that are no longer available.
- Hit the Close option.
- Select Next.
- Choose the Finish option.
When the user completes the process, System restore will turn the PC into an older functioning condition.
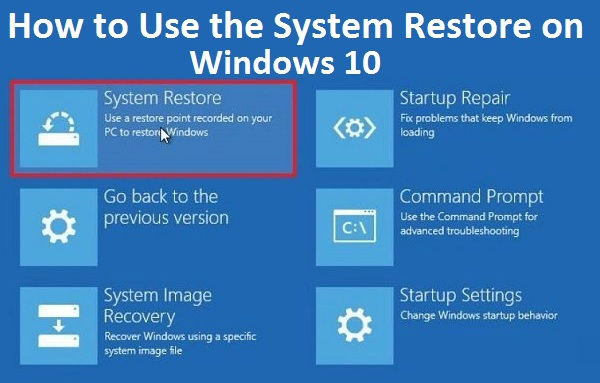
Undo the System Changes via Advanced Startup
If the system is not working correctly or not starting successfully or you are unable to access the desktop, then you can use Advanced startup to access the System Restore.
How to Boot in the Advanced Startup
In case you intend to boot in the Advanced startup, then go through the below-mentioned steps:
- Switch on the PC.
- Click the power option when the logo displays to disrupt the booting process.
- Repeat the steps two times.
When the procedure is complete, you can access the System Restore.
Via System Restore
The users can access the system restore when their PC does not start properly.
Follow the provided instructions to boot via System Restore:
- Tap on Advanced option.
- Select Troubleshoot.
- Choose Advanced options.
- Press System Restore.
- Hit the Next option.
- Tap on restore point you like to use on PC.
- Select Scan for affected programs option to recognize the apps that are no longer accessible.
- Select the Close option.
- Choose Next.
- Hit the Finish option.
When the user completes the process, the changes that are creating issues will be removed and the device will start working correctly. The users can use the same steps if they have the older version like Windows 8.1 or 7. Always be careful as the system restore is not the replacement for the backup or not the option to reset the PC in default settings. If a hard drive on a PC is facing physical problems or, then the user cannot recover the files.
Aurora is an engineer by day and writer by night. Previously, Aurora worked as a certified technicians for a tech hardware startup. In her free time, she likes to write about printers, routers, web browsers, and other technical stuff. She majorly writes for canon printer support etc.
Source: System Restore on Windows 10
 3770
3770

*********0@mainmile.com
Online multiplayer battle royale game called stumble guys! Online races between up to 32 players feature frantic obstacle courses.